같이 공부해봅시다.
부트스트랩. 웹화면, 앱화면. 반응형웹이니 가능한 것이겠죠.
실제 만들고 싶은 디자인을 해보면서 만들어보아요.
https://infott2t.github.io/smartfactory-app-design/ 다 만든 결과 페이지 입니다. github. 참조해보세요.
html프로젝트 만들기
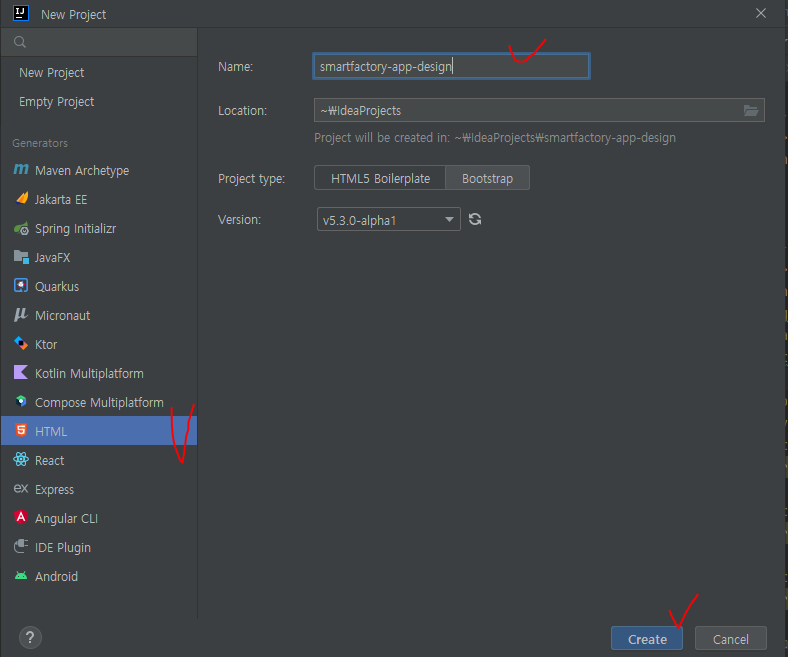
IDE툴. 저는 인텔리제이를 사용하는 군요. 프로그램을 열어주고...

File > New > Project. 위와 같이 선택해 줌니다.
index.html 파일 만들기
index.html 파일을 하나 만듬니다.

부트스트랩 기본 페이지 복사 붙여넣기
부트스트랩 페이지에서 template를 복사해서 붙여넣기 해줌니다.
Bootstrap
Powerful, extensible, and feature-packed frontend toolkit. Build and customize with Sass, utilize prebuilt grid system and components, and bring projects to life with powerful JavaScript plugins.
getbootstrap.com
<!doctype html>
<html lang="en">
<head>
  <meta charset="utf-8">
  <meta name="viewport" content="width=device-width, initial-scale=1">
  <title>Bootstrap demo</title>
  <link href="https://cdn.jsdelivr.net/npm/bootstrap@5.2.3/dist/css/bootstrap.min.css" rel="stylesheet" integrity="sha384-rbsA2VBKQhggwzxH7pPCaAqO46MgnOM80zW1RWuH61DGLwZJEdK2Kadq2F9CUG65" crossorigin="anonymous">
</head>
<body>
<h1>Hello, world!</h1>

<!--내용적기 -->

<script src="https://cdn.jsdelivr.net/npm/bootstrap@5.2.3/dist/js/bootstrap.bundle.min.js" integrity="sha384-kenU1KFdBIe4zVF0s0G1M5b4hcpxyD9F7jL+jjXkk+Q2h455rYXK/7HAuoJl+0I4" crossorigin="anonymous"></script>
</body>
</html>
위와 같은 형태가 될검니다. 저의 경우에는 인텔리제이에 부트스트랩 파일들이 들어있어서, 이렇게 되는 군요.
<!doctype html>
<html lang="en">
<head>
  <meta charset="utf-8">
  <meta name="viewport" content="width=device-width, initial-scale=1">
  <title>Bootstrap demo</title>
  <link href="css/bootstrap.min.css" rel="stylesheet">
</head>
<body>
<h1>Hello, world!</h1>

<!--내용적기 -->

<script src="js/bootstrap.bundle.min.js"></script>
</body>
</html>
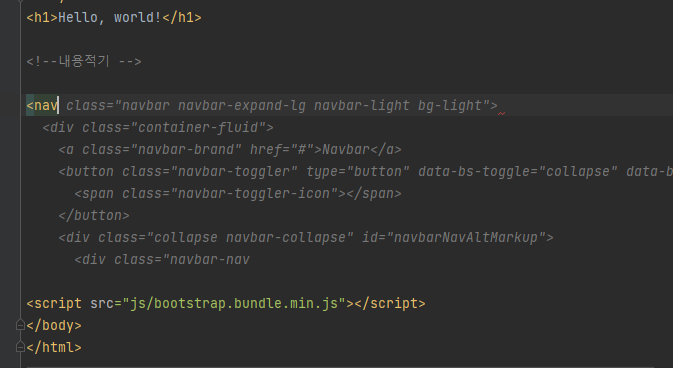
네비게이션을 위와 밑에 달아줌니다. 위에는 검색용. 아래는 메뉴가 든 네비게이션... Git Copilot이 다 적어준다는 사실...

결제해야되더라구요. 한달에 만원정도. SpringBoot JPA를 사용할때에 중복코드 제거에 도움이 되기도 하구요. 편하네요.
네비게이션 기본코드를 잘 보여줌니다. navbar navbar-expand-lg의 경우, 라지가 되었을때 navar를 펼친다. 이런 것 같습니다. collapse가 되서, 햄버거... 그렇게 줄어드는 메뉴일때죠.
<nav class="navbar navbar-expand-lg navbar-light bg-light">
  <div class="container-fluid">
    <a class="navbar-brand" href="#">Navbar</a>
    <button class="navbar-toggler" type="button" data-bs-toggle="collapse" data-bs-target="#navbarNavAltMarkup" aria-controls="navbarNavAltMarkup" aria-expanded="false" aria-label="Toggle navigation">
      <span class="navbar-toggler-icon"></span>
    </button>
    <div class="collapse navbar-collapse" id="navbarNavAltMarkup">
      <div class="navbar-nav">
        <a class="nav-link active" aria-current="page" href="#">Home</a>
        <a class="nav-link" href="#">Features</a>
        <a class="nav-link" href="#">Pricing</a>
        <a class="nav-link disabled" href="#" tabindex="-1" aria-disabled="true">Disabled</a>
      </div>
    </div>
  </div>
</nav>
잘 보시면.. nav태그로 겉을 감싸고 있고, 그 다음에 div 로 전체를 감싸구요. a 태그와 button이 있습니다. button안에 collapse가 있고... 그 밑에 collapse가 클래스인 div가 있는 것이죠.
<nav class="navbar navbar-expand-lg navbar-light bg-light">
  <div class="container-fluid">

    <!--a 태그, 브랜드 텍스트-->
    <a class="navbar-brand" href="#">Navbar</a>

    <!--button태그,  nav var의 햄버거 모양 버튼 -->
    <button class="navbar-toggler" type="button" data-bs-toggle="collapse" data-bs-target="#navbarNavAltMarkup" aria-controls="navbarNavAltMarkup" aria-expanded="false" aria-label="Toggle navigation">
      <span class="navbar-toggler-icon"></span>
    </button>

    <!--햄버거 버튼안에 메뉴-->
    <div class="collapse navbar-collapse" id="navbarNavAltMarkup">

  </div>
</nav>
실제로, 햄버거 버튼의 메뉴가 없다면, a 태그, 브랜드 텍스트처럼, 이어서 적어주면 됨니다. navbar-expand-lg로 인해서, 화면 크기가 lg이상일때, 펼쳐진 메뉴가 되고, 작아지면, 햄버거 모양이 되는 것이죠.
네비게이션을 상단 고정할 때는 fixed-top, 하단 고정할 때는 fixed-bottom. 이렇게 클래스에 적어주면 됨니다.
상단 서치바 만들기. fixed-top.
상단 서치바이기 때문에, fixed-top을 적어주고, 텍스트필드, 버튼을 달아줌니다.
<nav class="navbar navbar-expand-lg navbar-light bg-light fixed-top">
  <div class="container-fluid">
    <a class="navbar-brand" href="#">Navbar</a>
    <form class="d-flex">
      <input class="form-control me-2" type="search" placeholder="Search" aria-label="Search">
      <button class="btn btn-outline-success" type="submit">Search</button>
    </form>

  </div>
</nav>
Git Copilot이 form을 입력했는데... 나름대로, 버튼과 서치바를 그려주네요. form을 적기전에, <input type="text"/>이렇게 적고 지웠는데요.
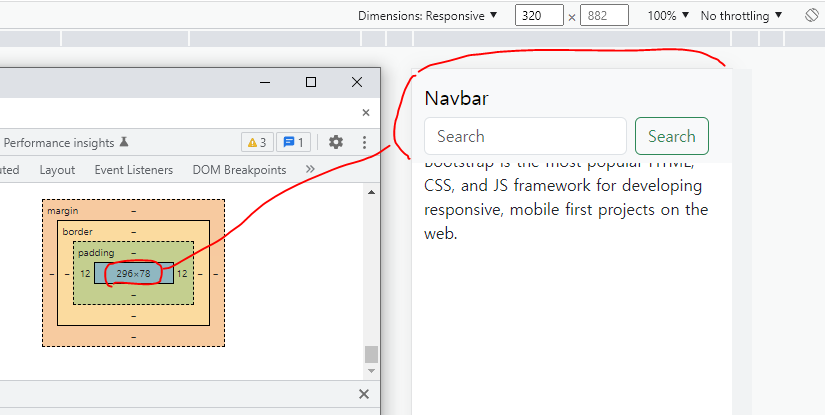
그리고, nav태그에 fixed-top 클래스를 추가했습니다. 이렇게 하면, 상단에 바가 고정이 됨니다. 상단바의 높이만큼, 빼줘야겠죠. 실제 본문의 위치가 그만큼 아래에 위치해야 하구요.
상단 메뉴바 만큼, padding값 주어서 글을 아래 표시하기.
상단 메뉴바의 높이만큼, 글을 아래에 표시하게 해주는 것이 군요. css블럭을 html파일 안에 담아줌니다.
<style>
        .navbar-brand {
            font-size: 1rem;
        }


        .body-text {
            padding-top:78px;
        }
</style>
</head>

<body>

<nav></nav>

<div class="container body-text"></div>

</body>
head태그 안에 담아주면 됨니다. body-text 클래스를 추가하고, div로 container를 하나 만들고, nav태그 밑에 적어주고, body-text클래스를 추가 해주면 됨니다.
<!doctype html>
<html lang="en">
<head>
  <meta charset="utf-8">
  <meta name="viewport" content="width=device-width, initial-scale=1">
  <title>Bootstrap demo</title>
  <link href="css/bootstrap.min.css" rel="stylesheet">
</head>
<body>
<h1>Hello, world!</h1>

<!--내용적기 -->

<nav class="navbar navbar-expand-lg navbar-light bg-light fixed-top">
  <div class="container-fluid">
    <a class="navbar-brand" href="#">Navbar</a>
    <form class="d-flex">
      <input class="form-control me-2" type="search" placeholder="Search" aria-label="Search">
      <button class="btn btn-outline-success" type="submit">Search</button>
    </form>

  </div>
</nav>
<div class="container body-text">
 <row>
   <div class="col-md-12">
     <h1>Bootstrap 4</h1>
     <p>Bootstrap is the most popular HTML, CSS, and JS framework for developing responsive, mobile first projects on the web.</p>
   </div>
 </row>
</div>

<script src="js/bootstrap.bundle.min.js"></script>
</body>
</html>
위의 html을 실행해보면, 글자가 표시 되지 않는 것을 알 수 있어요.

높이가 78. 그만큼 더해줌니다. html파일안에 css블럭을 넣어줌니다. 맨 처음에 적은 코드 내용입니다.
하단 메뉴바 만들기. fixed-bottom.
하단 메뉴바의 경우는, collapse가 되게. 또는 앱 디자인 형식의 탭으로 표시하기. 이렇게 되겠죠. 앱 디자인 형식으로 만들어 줌시다.
<footer class="footer mt-auto navcustom fixed-bottom">
    <div class="container">
        <ul class="nav nav-justified">
            <li class="nav-item">
                <a class="nav-link icon-color" aria-current="page" href="#">
                    <svg xmlns="http://www.w3.org/2000/svg" width="20" height="20" fill="currentColor" class="bi bi-house-fill" viewBox="0 0 16 16">
                        <path d="M8.707 1.5a1 1 0 0 0-1.414 0L.646 8.146a.5.5 0 0 0 .708.708L8 2.207l6.646 6.647a.5.5 0 0 0 .708-.708L13 5.793V2.5a.5.5 0 0 0-.5-.5h-1a.5.5 0 0 0-.5.5v1.293L8.707 1.5Z"/>
                        <path d="m8 3.293 6 6V13.5a1.5 1.5 0 0 1-1.5 1.5h-9A1.5 1.5 0 0 1 2 13.5V9.293l6-6Z"/>
                    </svg>
                </a>
            </li>
            <li class="nav-item">
                <a class="nav-link icon-color" href="#">
                    <svg xmlns="http://www.w3.org/2000/svg" width="20" height="20" fill="currentColor" class="bi bi-building" viewBox="0 0 16 16">
                        <path d="M4 2.5a.5.5 0 0 1 .5-.5h1a.5.5 0 0 1 .5.5v1a.5.5 0 0 1-.5.5h-1a.5.5 0 0 1-.5-.5v-1Zm3 0a.5.5 0 0 1 .5-.5h1a.5.5 0 0 1 .5.5v1a.5.5 0 0 1-.5.5h-1a.5.5 0 0 1-.5-.5v-1Zm3.5-.5a.5.5 0 0 0-.5.5v1a.5.5 0 0 0 .5.5h1a.5.5 0 0 0 .5-.5v-1a.5.5 0 0 0-.5-.5h-1ZM4 5.5a.5.5 0 0 1 .5-.5h1a.5.5 0 0 1 .5.5v1a.5.5 0 0 1-.5.5h-1a.5.5 0 0 1-.5-.5v-1ZM7.5 5a.5.5 0 0 0-.5.5v1a.5.5 0 0 0 .5.5h1a.5.5 0 0 0 .5-.5v-1a.5.5 0 0 0-.5-.5h-1Zm2.5.5a.5.5 0 0 1 .5-.5h1a.5.5 0 0 1 .5.5v1a.5.5 0 0 1-.5.5h-1a.5.5 0 0 1-.5-.5v-1ZM4.5 8a.5.5 0 0 0-.5.5v1a.5.5 0 0 0 .5.5h1a.5.5 0 0 0 .5-.5v-1a.5.5 0 0 0-.5-.5h-1Zm2.5.5a.5.5 0 0 1 .5-.5h1a.5.5 0 0 1 .5.5v1a.5.5 0 0 1-.5.5h-1a.5.5 0 0 1-.5-.5v-1Zm3.5-.5a.5.5 0 0 0-.5.5v1a.5.5 0 0 0 .5.5h1a.5.5 0 0 0 .5-.5v-1a.5.5 0 0 0-.5-.5h-1Z"/>
                        <path d="M2 1a1 1 0 0 1 1-1h10a1 1 0 0 1 1 1v14a1 1 0 0 1-1 1H3a1 1 0 0 1-1-1V1Zm11 0H3v14h3v-2.5a.5.5 0 0 1 .5-.5h3a.5.5 0 0 1 .5.5V15h3V1Z"/>
                    </svg>
                </a>
            </li>
            <li class="nav-item">
                <a class="nav-link icon-color" href="#">
                    <svg xmlns="http://www.w3.org/2000/svg" width="20" height="20" fill="currentColor" class="bi bi-bell" viewBox="0 0 16 16">
                        <path d="M8 16a2 2 0 0 0 2-2H6a2 2 0 0 0 2 2zM8 1.918l-.797.161A4.002 4.002 0 0 0 4 6c0 .628-.134 2.197-.459 3.742-.16.767-.376 1.566-.663 2.258h10.244c-.287-.692-.502-1.49-.663-2.258C12.134 8.197 12 6.628 12 6a4.002 4.002 0 0 0-3.203-3.92L8 1.917zM14.22 12c.223.447.481.801.78 1H1c.299-.199.557-.553.78-1C2.68 10.2 3 6.88 3 6c0-2.42 1.72-4.44 4.005-4.901a1 1 0 1 1 1.99 0A5.002 5.002 0 0 1 13 6c0 .88.32 4.2 1.22 6z"/>
                    </svg>
                </a>
            </li>
            <li class="nav-item">
                <a class="nav-link icon-color" href="#">
                    <svg xmlns="http://www.w3.org/2000/svg" width="20" height="20" fill="currentColor" class="bi bi-person" viewBox="0 0 16 16">
                        <path d="M8 8a3 3 0 1 0 0-6 3 3 0 0 0 0 6Zm2-3a2 2 0 1 1-4 0 2 2 0 0 1 4 0Zm4 8c0 1-1 1-1 1H3s-1 0-1-1 1-4 6-4 6 3 6 4Zm-1-.004c-.001-.246-.154-.986-.832-1.664C11.516 10.68 10.289 10 8 10c-2.29 0-3.516.68-4.168 1.332-.678.678-.83 1.418-.832 1.664h10Z"/>
                    </svg>
                </a>
            </li>
    </div>
</footer>
svg아이콘을 달았는데요. 검색해보시면 관련 내용이 있을 거예요. ul태그와 li태그로 리스트형식으로 만들구요. fixed-bottom으로 감싸서 하단에 고정되게 만든 것 이구요. 복사해서 붙여넣기 하면 됨니다. svg아이콘을 맘에 드는 것으로 바꿔서 달아보면 되겠죠~.
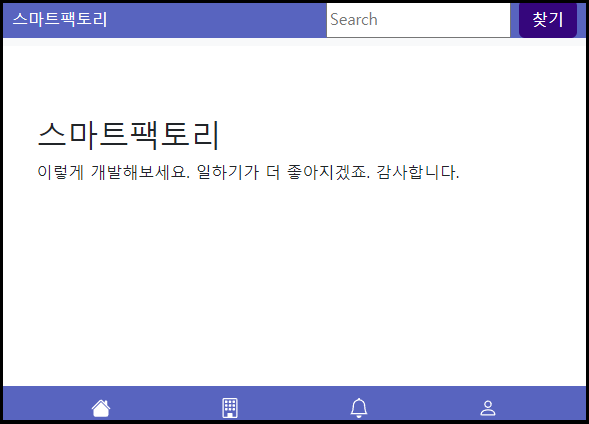
완성입니다. 색을 바꿔서 달아도 좋겠구요~. body-text. 글을 카드 레이아웃에 담아서, 보기 좋게 해주는 방법도 있겠죠.
완성해봤습니다. 참조해보세요.
<!doctype html>
<html lang="en">
<head>
  <meta charset="utf-8">
  <meta name="viewport" content="width=device-width, initial-scale=1">
  <title>Bootstrap demo</title>
  <link href="css/bootstrap.min.css" rel="stylesheet">
  <style>
    .navbar-brand {
      font-size: 1rem;
    }
  .navcustom{
        background-color: #5864bf;

   }
  .cw{
    color: white;
  }
  .cedit{
    color: #35067c;
  }
  .navbutton {
    background-color: #35067c;
    color: white;
  }
  .fs10 {
    font-size: 10px;
  }
     .body-text{
       padding-top: 78px;
     }
  </style>

</head>
<body>
<h1>Hello, world!</h1>

<!--내용적기 -->

<nav class="navbar navbar-expand-lg navbar-light bg-light fixed-top">
  <div class="container-fluid navcustom">
    <a class="navbar-brand cw" href="#">스마트팩토리</a>
    <form class="d-flex" role="search">
      <input class="me-2 " type="search" placeholder="Search" aria-label="Search">
      <a class="btn navbutton" type="submit">찾기</a>
    </form>

  </div>
</nav>
<div class="container body-text">
 <div class="row">
   <div class="col-md-12">
     <h1>스마트팩토리</h1>
     <p>이렇게 개발해보세요. 일하기가 더 좋아지겠죠. 감사합니다.</p>
   </div>
 </div>
</div>

<footer class="footer mt-auto navcustom fixed-bottom">
  <div class="container">
    <ul class="nav nav-justified">
      <li class="nav-item">
        <a class="nav-link icon-color cw" aria-current="page" href="#">
          <svg xmlns="http://www.w3.org/2000/svg" width="20" height="20" fill="currentColor" class="bi bi-house-fill" viewBox="0 0 16 16">
            <path d="M8.707 1.5a1 1 0 0 0-1.414 0L.646 8.146a.5.5 0 0 0 .708.708L8 2.207l6.646 6.647a.5.5 0 0 0 .708-.708L13 5.793V2.5a.5.5 0 0 0-.5-.5h-1a.5.5 0 0 0-.5.5v1.293L8.707 1.5Z"/>
            <path d="m8 3.293 6 6V13.5a1.5 1.5 0 0 1-1.5 1.5h-9A1.5 1.5 0 0 1 2 13.5V9.293l6-6Z"/>
          </svg>
        </a>
      </li>
      <li class="nav-item">
        <a class="nav-link icon-color cw" href="#">
          <svg xmlns="http://www.w3.org/2000/svg" width="20" height="20" fill="currentColor" class="bi bi-building" viewBox="0 0 16 16">
            <path d="M4 2.5a.5.5 0 0 1 .5-.5h1a.5.5 0 0 1 .5.5v1a.5.5 0 0 1-.5.5h-1a.5.5 0 0 1-.5-.5v-1Zm3 0a.5.5 0 0 1 .5-.5h1a.5.5 0 0 1 .5.5v1a.5.5 0 0 1-.5.5h-1a.5.5 0 0 1-.5-.5v-1Zm3.5-.5a.5.5 0 0 0-.5.5v1a.5.5 0 0 0 .5.5h1a.5.5 0 0 0 .5-.5v-1a.5.5 0 0 0-.5-.5h-1ZM4 5.5a.5.5 0 0 1 .5-.5h1a.5.5 0 0 1 .5.5v1a.5.5 0 0 1-.5.5h-1a.5.5 0 0 1-.5-.5v-1ZM7.5 5a.5.5 0 0 0-.5.5v1a.5.5 0 0 0 .5.5h1a.5.5 0 0 0 .5-.5v-1a.5.5 0 0 0-.5-.5h-1Zm2.5.5a.5.5 0 0 1 .5-.5h1a.5.5 0 0 1 .5.5v1a.5.5 0 0 1-.5.5h-1a.5.5 0 0 1-.5-.5v-1ZM4.5 8a.5.5 0 0 0-.5.5v1a.5.5 0 0 0 .5.5h1a.5.5 0 0 0 .5-.5v-1a.5.5 0 0 0-.5-.5h-1Zm2.5.5a.5.5 0 0 1 .5-.5h1a.5.5 0 0 1 .5.5v1a.5.5 0 0 1-.5.5h-1a.5.5 0 0 1-.5-.5v-1Zm3.5-.5a.5.5 0 0 0-.5.5v1a.5.5 0 0 0 .5.5h1a.5.5 0 0 0 .5-.5v-1a.5.5 0 0 0-.5-.5h-1Z"/>
            <path d="M2 1a1 1 0 0 1 1-1h10a1 1 0 0 1 1 1v14a1 1 0 0 1-1 1H3a1 1 0 0 1-1-1V1Zm11 0H3v14h3v-2.5a.5.5 0 0 1 .5-.5h3a.5.5 0 0 1 .5.5V15h3V1Z"/>
          </svg>
        </a>
      </li>
      <li class="nav-item">
        <a class="nav-link icon-color cw" href="#">
          <svg xmlns="http://www.w3.org/2000/svg" width="20" height="20" fill="currentColor" class="bi bi-bell" viewBox="0 0 16 16">
            <path d="M8 16a2 2 0 0 0 2-2H6a2 2 0 0 0 2 2zM8 1.918l-.797.161A4.002 4.002 0 0 0 4 6c0 .628-.134 2.197-.459 3.742-.16.767-.376 1.566-.663 2.258h10.244c-.287-.692-.502-1.49-.663-2.258C12.134 8.197 12 6.628 12 6a4.002 4.002 0 0 0-3.203-3.92L8 1.917zM14.22 12c.223.447.481.801.78 1H1c.299-.199.557-.553.78-1C2.68 10.2 3 6.88 3 6c0-2.42 1.72-4.44 4.005-4.901a1 1 0 1 1 1.99 0A5.002 5.002 0 0 1 13 6c0 .88.32 4.2 1.22 6z"/>
          </svg>
        </a>
      </li>
      <li class="nav-item">
        <a class="nav-link icon-color cw" href="#">
          <svg xmlns="http://www.w3.org/2000/svg" width="20" height="20" fill="currentColor" class="bi bi-person" viewBox="0 0 16 16">
            <path d="M8 8a3 3 0 1 0 0-6 3 3 0 0 0 0 6Zm2-3a2 2 0 1 1-4 0 2 2 0 0 1 4 0Zm4 8c0 1-1 1-1 1H3s-1 0-1-1 1-4 6-4 6 3 6 4Zm-1-.004c-.001-.246-.154-.986-.832-1.664C11.516 10.68 10.289 10 8 10c-2.29 0-3.516.68-4.168 1.332-.678.678-.83 1.418-.832 1.664h10Z"/>
          </svg>
        </a>
      </li>
  </div>
</footer>

<script src="js/bootstrap.bundle.min.js"></script>
</body>
</html>
페이지는 이렇게 되겠죠.
index.html 제일 처음의 페이지. 아마도 로그인, 그냥 들어가기 버튼이 있는 화면.
welcome.html페이지. 로그인 한 뒤 바로 접속되는 html페이지.
search.html 페이지. 찾기 버튼을 눌렸을 때에 페이지.
https://github.com/infott2t/smartfactory-app-design
GitHub - infott2t/smartfactory-app-design: Let's developing~. Smart Factory. More convinience work~. How about this. Thank you.
Let's developing~. Smart Factory. More convinience work~. How about this. Thank you. - GitHub - infott2t/smartfactory-app-design: Let's developing~. Smart Factory. More convinience work~. H...
github.com
참조해보세요~.
좋은 하루되세요~.
--
저의 글, 봐 주셔서 감사합니다.
'프로그래밍' 카테고리의 다른 글
| [웹프로그래밍] SpringBoot JPA +QueryDSL CRUD 자동화 사용해보자. -1. (0) | 2023.01.22 |
|---|---|
| [일상] 빠르면 오늘 중에 완성... 스프링부트 JPA + 타임리프... 자동코드. 그렇군요. (0) | 2023.01.22 |
| [웹 프로그래밍] 스프링부트JPA 8. 테이블을 자동생성해보자~. (0) | 2023.01.14 |
| [웹 프로그래밍] 스프링부트JPA 7-2. QueryDSL설명~. 검색기능. (0) | 2023.01.12 |
| [웹앱 디자인] 스프링부트JPA 7. 개발방식, 데이터를 게시판 CRUD화 하기. CRUD프로젝트 생성. (0) | 2023.01.09 |